Easter Pavlova

Easter baking is like Christmas baking in our house: I make a list of all the recipes I want to try and make and then start by prioritising what will get made according to available time, my budget and what I think the kids will enjoy most.

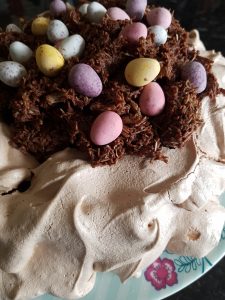
Easter nests make an appearance in some variation every year, but as I have been wanting to make meringues with the kids for a while and my dislike of cream prevents me from wanting to make a traditional pavlova, I decided that we would attempt a big chocolate meringue nest which could be decorated with chocolate-coated shredded wheat and a copious amount mini eggs.

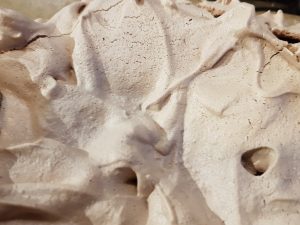
I enjoy making meringues and chocolate meringues are even better, but that said mine do always end up cracked – this is generally because like an excited child I seem to lack the capacity to wait until the oven has completely cooled before opening it. That said, a crack here and there doesn’t alter the taste. It just gives it more of a rustic look, a homemade ‘we had a go and made some memories’ look which you can’t get from any shop bought pudding.

I made the meringue with Atticus. He had so much fun not having to share the electric mixer with his older brother! It also provided opportunities to discuss with him what was happening as the egg whites were whisked without Seb answering the question first. It was fabulous to hear him try using the word 
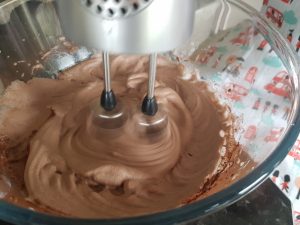
‘frothy’ and exclaim in delight as the egg whites expanded in size during whisking. Cooking is definitely a huge support for language as well as maths skills for  little mischief makers.  It was also lots of fun to dollop the meringue mixture onto the baking parchment and trying to make sure it stayed inside the circle we had drawn around a plate to mark out where it should be.

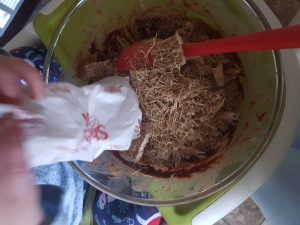
All the children, yes even Ophelia, helped to make the chocolate shredded wheat to put on top of the meringue. I am not at liberty to divulge how much chocolate (either melted or otherwise) was consumed during this process, but fun was had with very little bickering and my children all remained friends. The latter is of course of the utmost importance and I can happily report that I also managed to complete this activity with adequate levels of patience.

In order to make the big chocolate meringue you will need the following:

  • 4 egg whites
  • 250g caster sugar
  • 2tsp cocoa powder
  • 1tsp cornflour
  • 1tsp white wine vinegar
  • 1tsp vanilla extract

Method

  1. Heat the oven to 130°c fan. 
  2. Draw around a plate on baking parchment.
  3. Separate the eggs (I did this for Atticus as we don’t have an egg separator).
  4. Whisk the eggs until they form stiff peaks, sift in the 2tsp of cocoa powder and mix and then whisk in the sugar one tbsp at a time until the mixture is glossy.
  5. Whisk in the cornflour, white wine vinegar and vanilla extract.
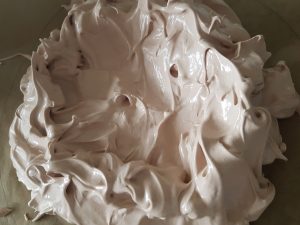
  6. Dollop the meringue onto the baking parchment being careful to ensure that it stays inside the circle. Make the outside of the circle taller than the centre.
  7. Cook in the oven for 1 hour and then turn off the oven and leave the meringue in the oven until it is completely cool. If you are like me it will be a struggle to resist the temptation to open the oven door when the oven is still hot. But please fight against this urge as you are more likely to be rewarded with an intact meringue which has less of a rustic appearance!

For the topping

  • 300g milk chocolate
  • 30g margarine
  • 2tbsp golden syrup
  • 5 or 6 shredded wheat
  • Mini eggs

Method

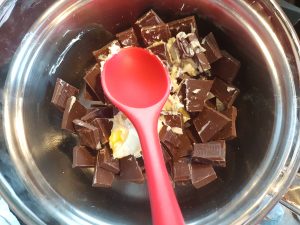
  1. Melt the chocolate, margarine and golden syrup on the stove top. The boys did have a go at this under supervision.
  2. Crush the shredded wheat, we tend to do this while they are in the packet as it is less messy. Add the crushed shredded wheat to the melted chocolate mixture (you may not need all 6 shredded wheat). Mix very well.
  3. Carefully place the chocolate-coated shredded wheat on top of the cooled meringue and then add as many mini eggs as you would like.

This pudding was pretty much entirely decimated in a single sitting by my family of five and my sister-in-law and her family of four. The boys had lots of fun telling their cousins how they made it.

A snack fit for Paddington – Chocolate Chip Marmalade Scones

I love bears and Winnie the Pooh is my all time favourite and has been since I was a small girl. My children love bears too, but they will not be influenced by mummy’s preferences: they do seem to like Paddington more than Winnie the Pooh. It might be because they have seen Paddington at the cinema, the marmalade jar has Paddington on it or simply because he is such a mischievous character that appeals to their own mischievous natures.  Ophelia has some vests with Paddington on them and she takes great delight at trying to pronounce Paddington.  I must admit that the first time she said it, I had to really concentrate to understand what she was saying.  A couple of minutes later it occurred to me that she was trying to pronounce Paddington – quite a difficult word for a 18 month old! She was, understandably, very proud of herself.

Behind chocolate spread, marmalade is Seb’s favourite topping for toast and crumpets and we often have a ‘Paddington lunch’ which is essentially a lunch of a marmalade sandwich often reading Paddington stories. To keep my life interesting, I thought we would try something new. Before you ask, yes my life is already quite hectic managing the three kids, but I do love to see their delighted faces when engrossed in an activity – any stress its preparation may have caused immediately vanishes. For pudding one evening, we created Paddington Toast from images we found online.  For us, this comprised a slice of orange fruit loaf (the closest flavour to marmalade!) toasted and cut into a circle with a biscuit cutter, covered with chocolate spread marked with a fork to look like fur, a strawberry and jelly bean hat (why do we always run out of one particular colour of jelly beans?!), a couple of blackcurrants for eyes, a Toffifee sweet for the nose and an icing smile. The kids had fun making these and they disappeared pretty sharpish. To make this a healthier snack, you could substitute the fruit toast for a rice cake, use peanut butter and a slice of banana instead of the sweet. The example that I made for the boys to copy is the one at the top.

This in turn got me thinking what would we do if Paddington ever comes to tea? You never know, it may just happen – I bet Sophie and her mum weren’t expecting a tiger to turn up on their doorstep, so in the unlikely event that Paddington ever does come to tea, my kids can impress him with their chocolate chip marmalade scones! Just like Sophie’s mum bought a tin of tiger food, I may be prepared with the ingredients ready to make these yummy scones if the need arises.

Ingredients

The ingredients are in cups to make it easier for children who do not yet recognise their numbers, but are able to scoop out a cup.

  • 1/4 of cup of marmalade
  • Juice of a clementine or satsuma
  • 1/4 cup of milk
  • 35g butter or margarine
  • 2tbsp caster sugar
  • 1 1/2 cups of self raising flour
  • 4tbsp chocolate chips

Method

  1. Preheat the oven to 180ºc fan.
  2. Place the marmalade in a microwave-safe cup and heat for 20 seconds. Add it to the milk and clementine juice and mix thoroughly. There may still be a few lumps, but that is OK.
  3. Put the butter, flour and sugar into a bowl and rub them together.  Add the marmalade milk mixture to the flour and combine until they form a dough.  If the mixture is too dry add more milk and if it is too liquid more flour.
  4. Add the chocolate chips and knead.  Turn out onto a lightly floured surface and cut out small scones.  This recipe will make 12 mini scones (we used a 5cm diameter cutter).
  5. Put in the oven for 15 minutes or until golden.

We served these with chocolate spread as you can never really go wrong with chocolate, but marmalade and clotted cream would also work well.

Pizza Scrolls

Children love pizza. I know there are rare exceptions to the rule, but what is not to like?! A yummy doughy base with a rich tomato sauce and an avalanche of melted cheese… Just thinking about it transports me back to the part of my year abroad that I spent in Italy and reminds me of all the delicious pizzas I sampled in the name of improving my Italian to meet my degree requirements. My kids are firmly planted in the we love pizza camp and cheese on toast comes with tomato paste on the toast as standard in our house. I do, however, feel the need to keep my life interesting and the kids do enjoy making what we call pizza scrolls. What they actually are is cheese and tomato croissants but rolled up like a savoury Chelsea bun.

To make this recipe you will need:

⦁ 1 tin of Jus -Roll croissants
⦁ Cream cheese
⦁ Tomato paste
⦁ Grated cheese of choice (we tend to use cheddar or mozzarella)
⦁ Dried mixed herbs or basil
⦁ Butter/margarine for greasing
⦁ 20cm circular springform tin

Method

1. Start by preheating your oven to 180ºc fan and let your child grease the tin. We use a silicone pastry brush and I let the kids ‘paint’ the margarine or butter all over.

2. Put 5 tablespoons of cream cheese in a bowl and mix with a couple tablespoons of tomato paste and add 2tsp of herbs. Mix well. My kids always love commenting on how the cream cheese is no longer white and act terribly surprised when it turns pink.

3. On a lightly floured surface (we tend to use a floured silicone baking mat on our counter) unwrap the croissant tin and unravel the croissants. Very gently squeeze the perforations together to ensure there are no holes in the pastry.

4. With the back of a spoon evenly spread the cream cheese mixture all over the pastry making sure all the corners are covered.

5. Sprinkle grated cheese on top. You will need a couple of adult-sized handfuls for this.

6. Choose an end and role the pastry up into a big scroll. It is important to keep it as tight as possible. Cut it into 6 even slices and place one in the middle of the tin and the others around it. Apply a thin milk glaze and then sprinkle with some grated cheese.

7. Place in the oven for 20 minutes. Check on it at 15 minutes and if it is browning too quickly cover with a foil hat until completely cooked.

8. Remove from the oven and these can be enjoyed warm or cold.

I shouldn’t have been surprised when these came out the oven that Atticus instantly declared that he wanted the middle one. Luckily it is very easy to separate them without any structural issues!