Cottage Potato Pies

My kids all seem to have decided that mashed potato is good. This is a far cry from where we were only a year ago, when we would have to embark upon massive negotiations to get our middle child to even consider having potato on his plate. This polar change has opened up many more recipes that are now deemed acceptable as the humble potato is no longer considered food enemy number one! Unfortunately, tomatoes and courgettes remain exiled from two of the kids’ plates, but we are celebrating small victories.

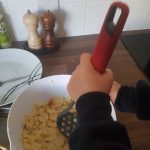
There is now generally a mini stampede when I mention making mashed potatoes. This is because they all enjoy mashing potatoes and making ‘worms’ appear through the masher. The act of mashing is always accompanied by shrieks of delight!

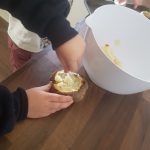
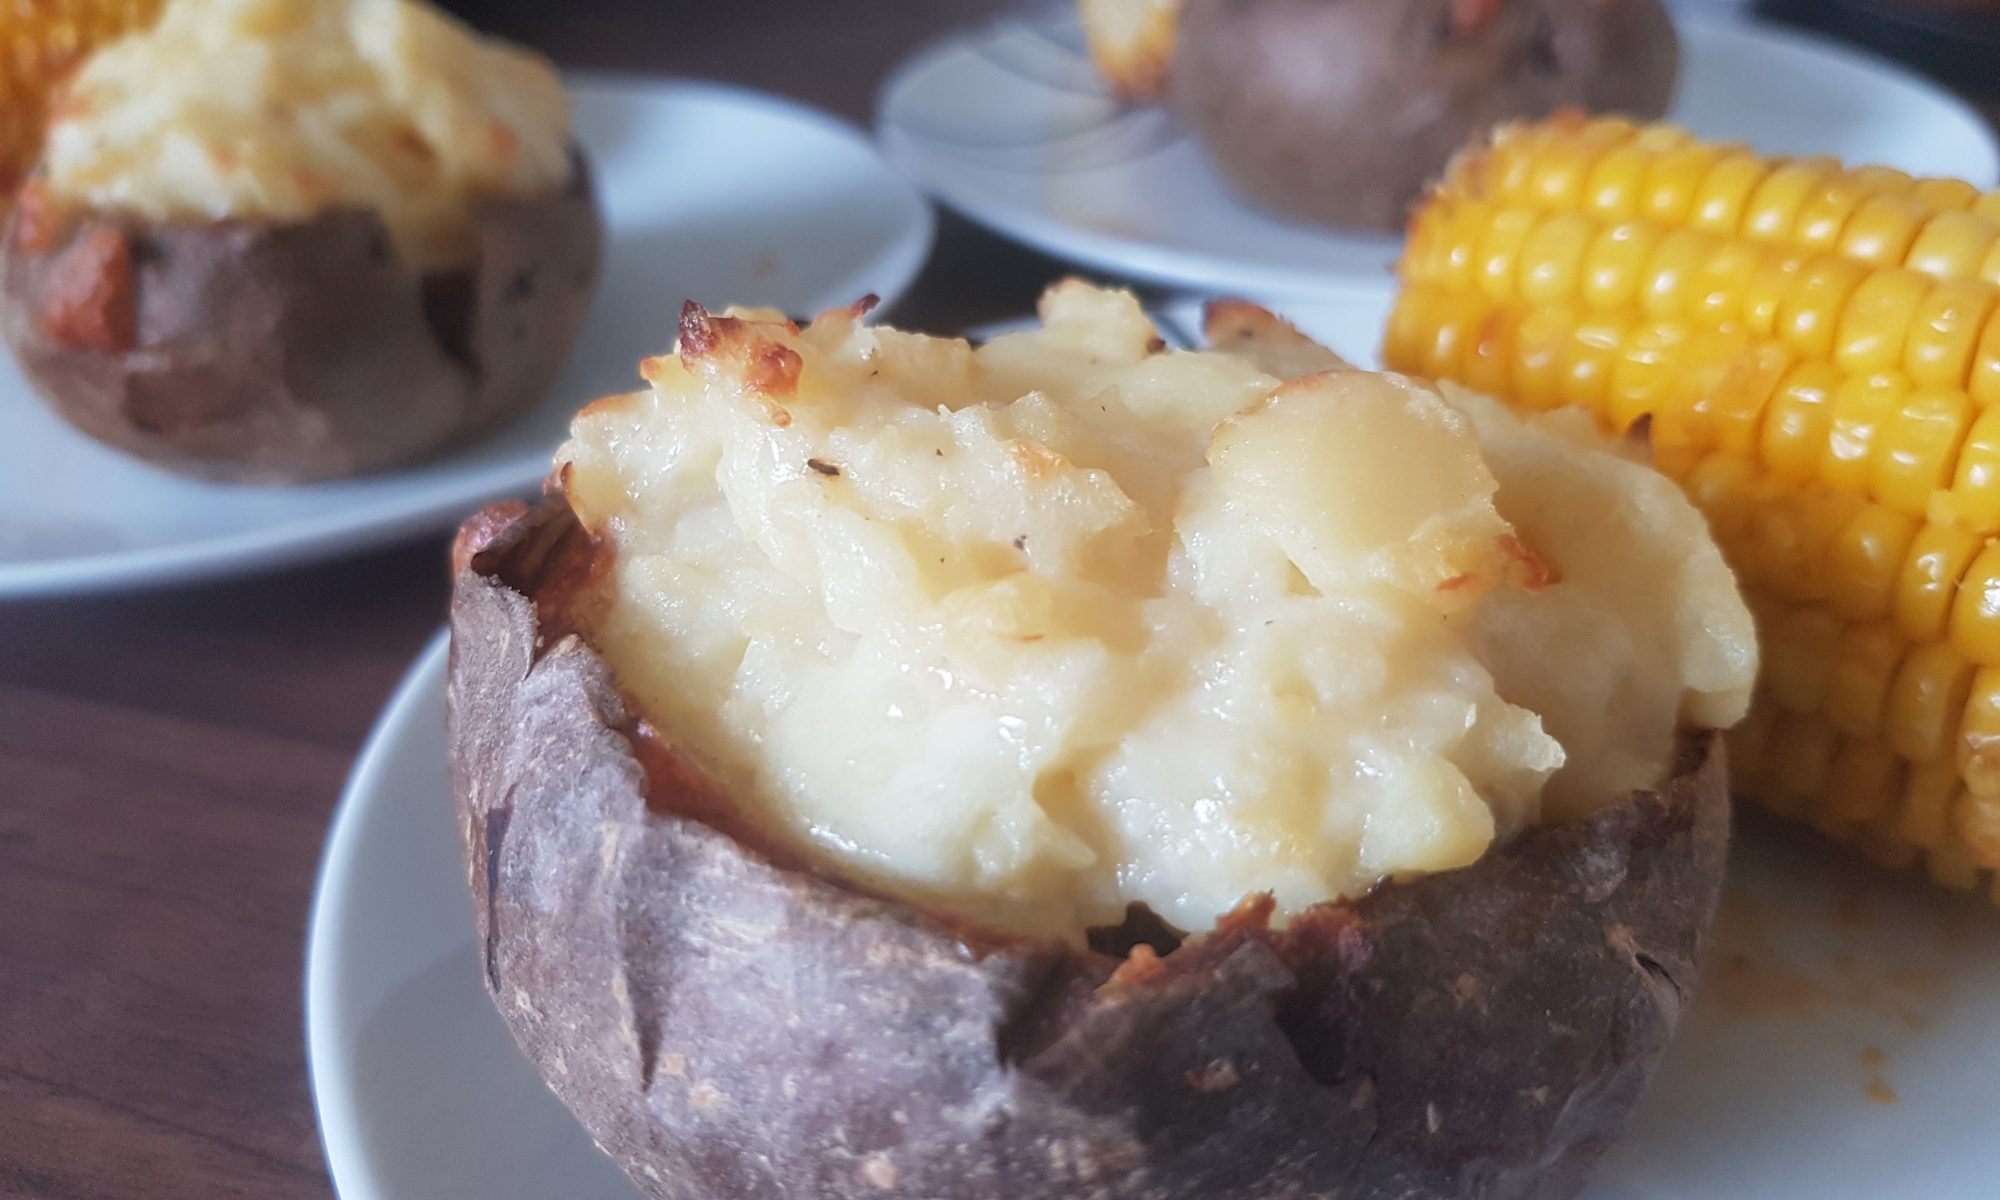
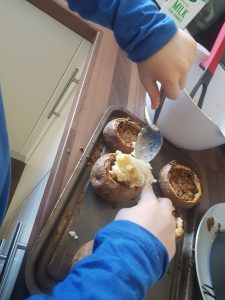
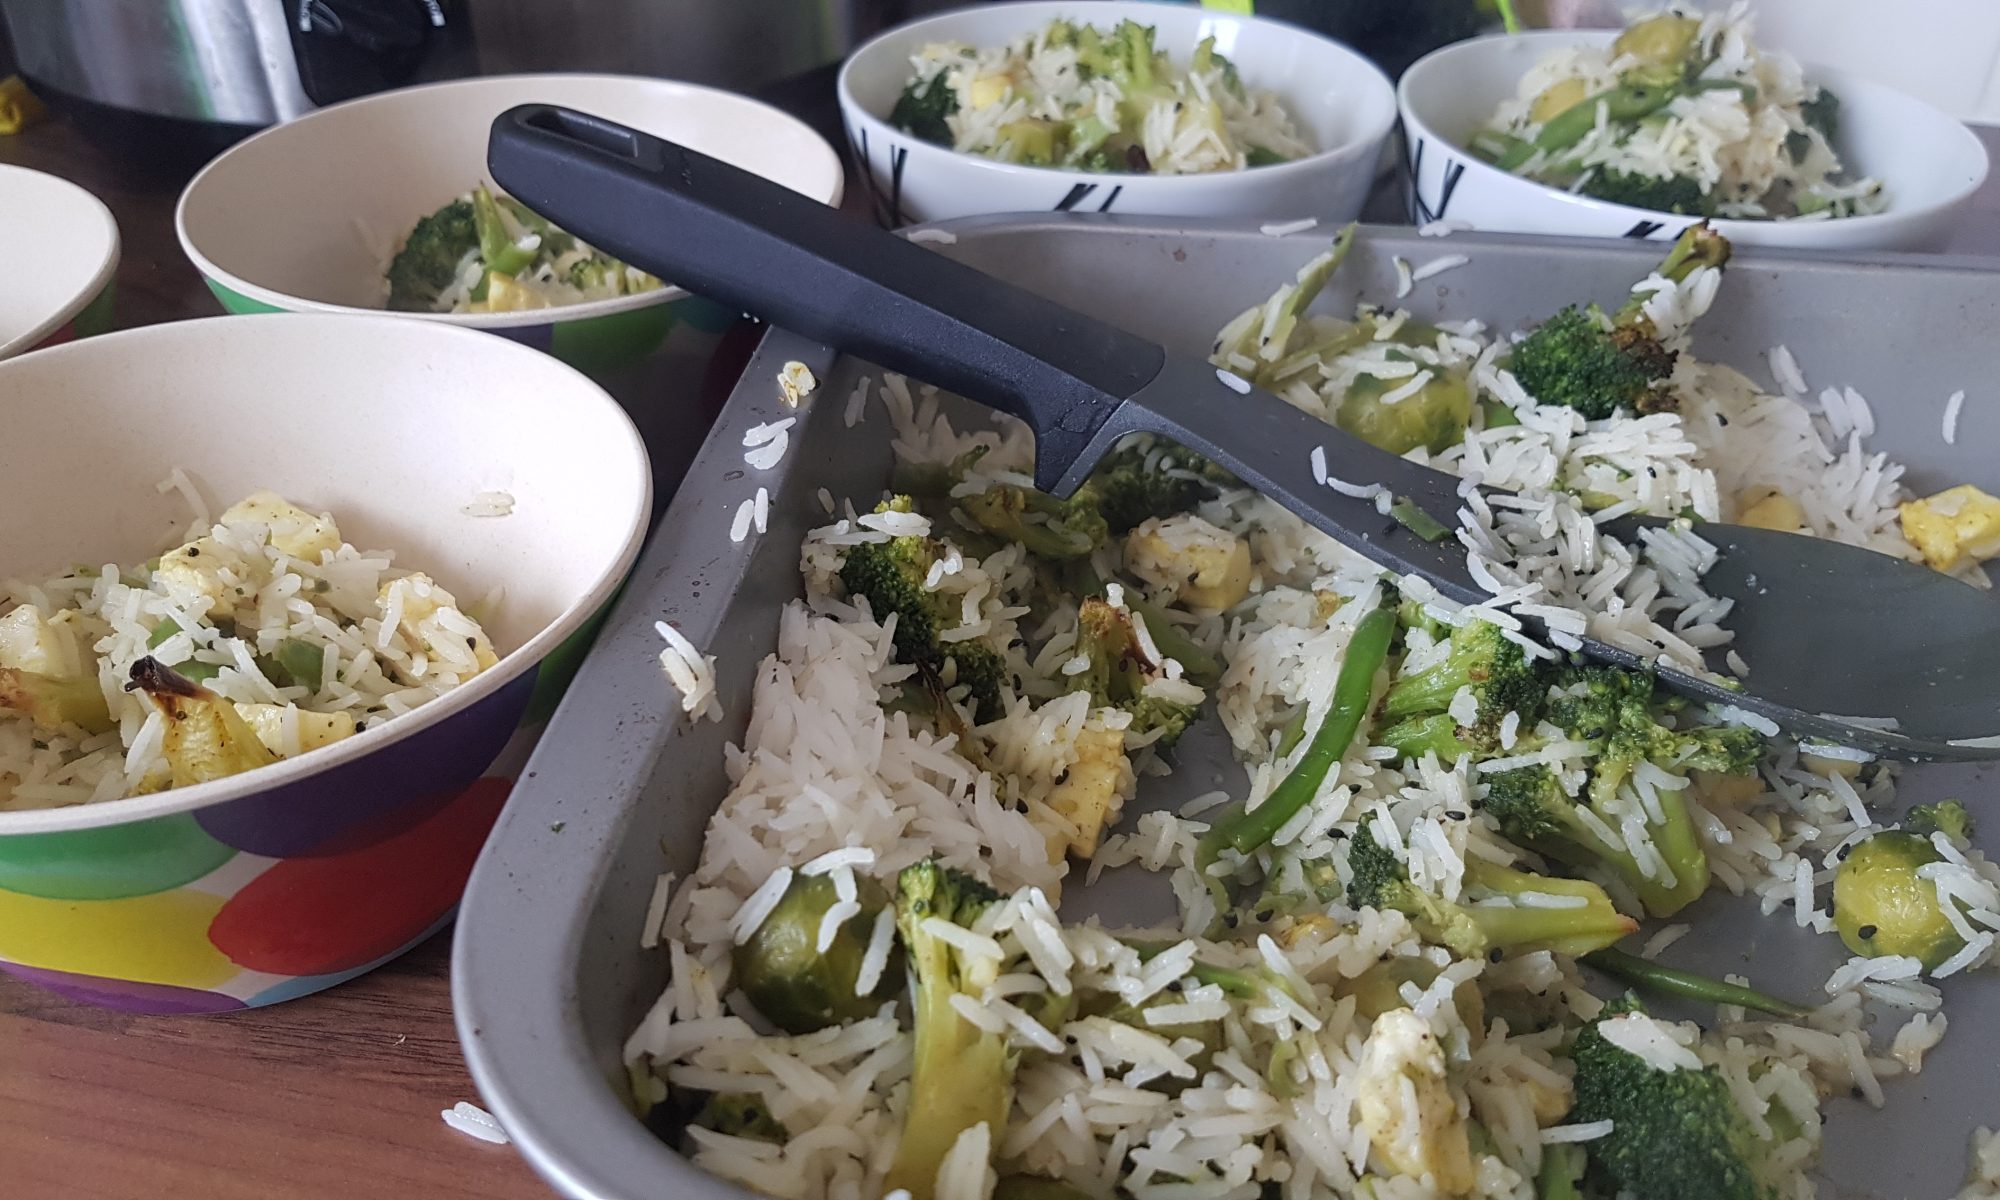
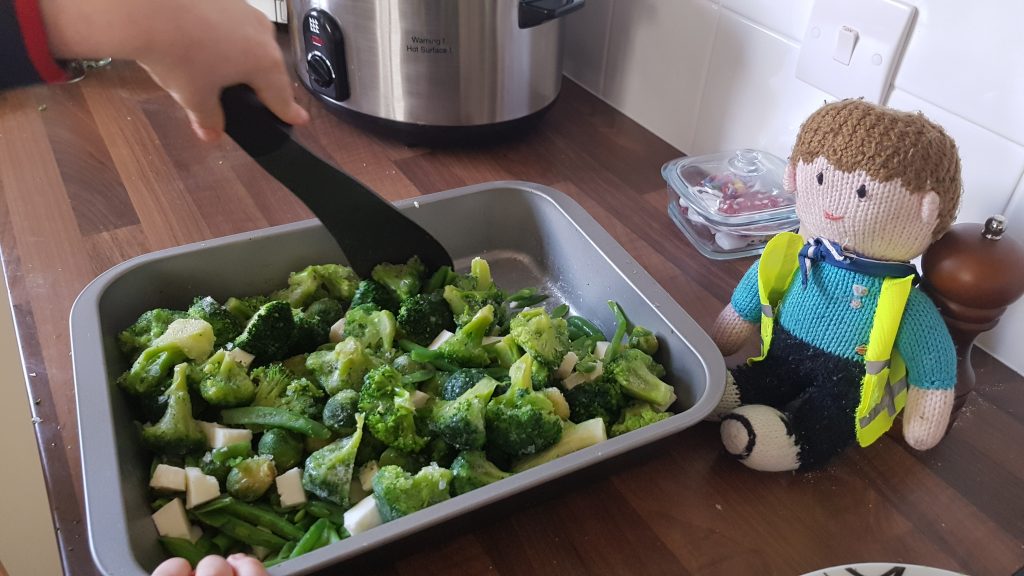
This meal is lots of fun to put together. My kids loved scooping out the inside of the cooked potato, spooning in the mince, mashing the potato, sprinkling in cheese and then transporting the potato back on top of the mince-filled potatoes. It is true that it requires a fair amount of parent preparation; cooking the potatoes and making the mince filling. Despite this it is definitely worth the effort. It is also an incredibly versatile recipe which can be made vegetarian by using a Quorn or a lentil filling instead of the mince.

To make 4 jacket potatoes you will need:

  • 4 jacket potatoes
  • 50g grated mozzarella
  • 2-3tbsp milk
  • 500g beef mince
  • 2 carrots
  • 1 onion
  • 500 ml beef stock
  • 3tbsp tomato paste
  • Seasoning; dried herbs and garlic, salt and pepper

Parent prep

  • Cook and cool jacket potatoes and slice the tops off.
  • Make the beef filling by frying the onions and carrot with the seasoning. Brown the meat and then add the stock and tomato paste and allow to simmer for 30 minutes until it has reduced and cool.

Kiddie jobs

  1. Scoop out the inside of the potatoes being careful not to break the potato skin and put into a large bowl.
  2. Mash the potato and add the cheese and milk.
  3. Spoon the meat filling into the potato shells.
  4. Cover with mashed potato.
  5. Place in the oven for 15-20 minutes at 160°c fan until warm through.

Hulk Halloumi Bake

Are your children superhero obsessed? Mine certainly are and I am not ashamed to admit that I use this to my advantage somewhat when they are confronted with a vegetable they don’t want to try. We talk about vegetables helping them to be strong like superheroes and helping them to build up their vitamin stores for strength. In particular, the green ones which generally have a slightly more bitter taste. And as the hulk is green in colour, we make that connection too. My parents used to tell me to eat my vegetables so I would be strong like Popeye (even though it felt like a dated cartoon when I was small) so maybe this is just the modern version! So this is the reason for the name of the dish. It isn’t an original recipe of mine, but an adaptation of a recipe from one of my favourite cookery authors, Rukmini Iyer in her book the Green Roasting Tin. As a family we love Rukmini’s recipes and they frequently make an appearance on our dinner table or get sent into school with the kids on their birthdays.

The first time we made it I loved it, but my family didn’t appreciate all the Brussel Sprouts, so we adapted it to include some other green vegetables too. We make it with frozen vegetables as that is the most economical way to ensure we all get enough fruit and vegetables in our diet here in the Falklands. It also means that you can buy the ingredients for this dish and it doesn’t matter if it takes you a while to get around to making it as the vegetables won’t spoil and halloumi generally has a long shelf life when in a sealed packet.

Ronan watching Seb with his high-vis jacket (at least we would see if he fell in) and little grin.

This dish was our activity when Sebastian had Ronan, the take home knitted Beaver, for the week. Ronan sat on the counter and ‘helped’ us make this dish. We didn’t have any disasters – no falling in or unwelcome splatters and Seb happily spouting the importance of vegetables in a healthy diet the whole way through our endeavours. Ronan returned to Beavers the following week safe and sound after his Hulk Halloumi Bake! It has to be said our entry was one of the more boring ones, but it was second nature to me as the kids cook with me on a weekly basis. No extra planning required! I reckon that makes me a superhero in my own right!!!

Ingredients

  • 1 block of halloumi
  • 400g broccoli
  • 75g Brussel sprouts
  • 200g green beans
  • 2tbsp olive oil
  • 3tsp garlic
  • 2tsp nigella seeds
  • 2tsp garam masala
  • 3tbsp lemon juice
  • Seasoning
  • 350g cooked rice (warm)
Mix it all around.

Method

  1. If you are using frozen vegetables like we did, remove from the freezer and allow to defrost for half hour or so.
  2. Preheat the oven to 180°c fan.
  3. Chop the halloumi into small squares with a child safe knife. Chop any large piece of broccoli into smaller pieces.
  4. Add the halloumi, broccoli, Brussel sprouts and green beans to a roasting dish.
  5. Drizzle with the oil, add the garlic, nigella seeds, garam masala and seasoning.
  6. Gently agitate the tray so that the vegetables and halloumi are covered with spices and oil. Be careful not to shake up and down!
  7. Put in the oven for 20 minutes.
  8. Remove from the oven and mix the cooked rice and lemon juice through with the halloumi and vegetables.
  9. Distribute between bowls and enjoy warm.
Ronan looks pretty proud of his creation!

I love this dish and it is one meal that my family can all eat together as it is vegetarian. I hope it goes down as well with your family as it does with mine.

Red Pepper and Cannellini Bean Fritters

Patience is an important commodity when dealing with children. It’s mere presence bolsters success in the kitchen with children. I mean it isn’t as if you need a kilo of it or anything – a sprinkling is just fine. That said, my stockpiles of patience have been dwindling this week. I should have known it was going to be a hard week when I hurt my leg running and my favourite outlet for solitary time vanished. This was further impacted, when I ended up late to collect Seb from a school club because I lost track of time and a last minute pre-schooler toilet trip.

Contrary children have certainly greatly contributed to this feeling of frustration. Allow me to provide an example: Ophelia loved making this recipe. She ate copious amounts of the individual ingredients, but barely countenanced the idea of eating the end product. I won’t lie, I had to take some deep breaths and think of the fact that our shipment has arrived and we now have all our stuff except our car. Once I had found these happy thoughts, I realised that this meant all the more for me to gobble up!

Not hugely photogenic, but totally delicious!
Sticky fingers warning!
Chopping with a table knife

This recipe is full of processes that children love; squishing and squashing, chopping, cracking, mixing and transporting. The latter is a mucky process, and if your child doesn’t enjoy getting their fingers dirty, you may well want to consider using a couple of tablespoons to make the fritters and flatten them a bit.

Ingredients

  • 1 tin cannellini beans
  • 150g roasted red peppers from jar
  • 75g sweetcorn
  • 1 beaten egg
  • 50g flour
  • 1/2 tsp garlic (we used frozen)
  • Seasoning

Method

  1. Adult line a couple of baking trays with silicone baking mats or baking parchment.
  2. Drain and rinse the cannellini beans and place in a large bowl.
  3. Mash the cannellini beans with a fork or potato masher. Small children may well require some help to get this started. Mash until they no longer look like beans.
  4. Chop the peppers into small pieces. We used table knives.
  5. Add the chopped peppers, sweetcorn, flour, seasoning and garlic to the mashed beans.
  6. Crack an egg into a small bowl or mug and gently whisk.
  7. Pour the egg into the bowl and mix with a wooden spoon.
  8. Using your hands make patties out of the mixture. Depending on their size, you should get between 6 and 8. If you don’t want to use your hands, dollop a couple of tablespoons per fritter and pat down with the back of a spoon.
  9. Refrigerate for around 1 hour (this makes them more stable) before cooking at 180°c fan for 15-20 minutes, turning half way through. Alternatively, they can be pan fried.

This recipe appeared in Penguin News on October 11, 2019. For those of you not lucky enough to be able to purchase a copy, I have included a picture of the article from the newspaper.

Stuffed Mushrooms

Mushrooms are my husband’s favourite vegetable. Unfortunately, they are not mine (long live courgettes!) Now I come to think of it Simon and I both have rather strong feelings about our favourite vegetables, but he wouldn’t choose to eat a courgette and I wouldn’t choose to eat a cooked mushroom. I like to eat button mushrooms raw, but don’t do so well when they are cooked. Two of our children seem to agree with me about the mushrooms, but the third, or actually the first, seems to quite enjoy them. It is real juggling act remembering what each child will or will not eat!

Lots of kid-friendly jobs.

To encourage the children to try mushrooms, I thought it was time that we tried to use them in a recipe. It was a fun recipe to make with chopping, measuring, spooning, mixing and then trying it. One boy enjoyed them with encouragement, the other ate the filling – which did also contain chopped mushroom so that is progress and the little girl completely ignored them on her plate. Their daddy quite happily dealt with all the leftovers without a single reference to me!

Ingredients

Serves 4 as an accompaniment.

  • 4 large flat mushrooms
  • 40g mozzarella
  • 15g pine nuts
  • 1tbsp pesto
  • 10g grated cheddar
  • 20g breadcrumbs

Method

  1. Preheat the oven to 180° fan and lightly grease a baking tray.
  2. With a table knife, carefully chop off the mushroom’s stalk and chop into small pieces and place in a bowl.
  3. Chop the mozzarella into small pieces and add to the bowl with the mushroom stalks.
  4. Add in the pine nuts and pesto and mix until it is all combined.
  5. Spoon the filling equally between the four mushrooms.
  6. In a separate bowl add the breadcrumbs and the cheddar and mix together. If your kids want to grate the cheese, I would recommend a box grater.
  7. Sprinkle the cheesy breadcrumbs over the mushrooms .
  8. Place in the oven for 15-20 minutes until the mushrooms are cooked.
  9. Remove from the oven and serve immediately.

This recipe featured in the September/October Soar Valley Life Magazine.

Sprinkling the cheese and breadcrumbs on top of the mushrooms and ready for the oven.

Spaghetti Carbonara

What you can’t see the concentration on her face!

I am not sure if your kids have a favourite dinner. For ours it has to be pesto pasta. This is completely fine by me as it is a quick fix, perfect for evening when they have after school activities and we are pressed for time. Now the kids don’t seem particularly fussed whether it contains chicken, bacon or even tuna, but it always gets gobbled up without any questions or complaints.

It took a couple of attempts to get the cloves out.

Now you might question; ‘if they have their favourite pasta dish, why mess with a good thing?!’ Well I am always on the look out for new pasta recipes which are just as simple to make and are as well received as pesto pasta. I dislike getting stuck in a rut with meal times and resorting to the same weekly meal plan.

The recipe below is easy to make and received the thumbs up from all the kids and their dad. As the resident vegetarian, I would have eaten it had it not contained the pancetta! Maybe next time we shall make a vegetarian one and have one of the rare evenings when we all eat the same meal!

Dinner time!

Ingredients

  • 350g of spaghetti, broken into half – this makes it easier for little people to manage.
  • 100g chopped pancetta
  • 100g grated parmesan
  • 3 eggs
  • 2 garlic cloves
  • 1tbsp butter
  • Freshly ground black pepper

Method

  1. Cook the spaghetti according to the packet’s instructions.
  2. Meanwhile, crack the eggs into a jug and beat with some pepper.
  3. Add the parmesan to the beaten eggs and mix and put to one side.
  4. Gently bash the garlic cloves with a rolling pin and peel them.
  5. Put the butter in a small frying pan and add the garlic and pancetta. Fry together stirring often. Remove the garlic cloves with a tongs once the pancetta is cooked.
  6. Drain the pasta reserving a small amount of the cooking water.
  7. Take the pan of the heat and place on a heat proof mat.
  8. Pour the egg and cheese mixture and the pancetta into the cooked spaghetti.
  9. Mix together while still in the saucepan and ensure that the spaghetti is fully coated.
  10. Add some of the spaghetti water to the sauce to loosen it if required. We needed to add 1tbsp.
  11. Serve immediately.

Salmon and Soy Sauce Bake

Slicing hard boiled eggs and taking about fractions.

I am sure I have already said so before, but if there is a request to help in the kitchen, it is always granted no matter how inconvenient it may be at the time. This does mean that some evenings dinner is ready a lot later than originally planned or even the latter – too early as they didn’t want to help! It has to be said though, sometimes asking them for help can lead to them not wanting to. I have learnt that if I start making the food using their colourful knives and doing things they like such as chopping vegetables, cracking eggs, whisking and mixing they become eager to help and argue over whose turn it is next!

Measuring out the soy sauce. There was an intense look of concentration on his face as he completed this task!

We didn’t have any such scenario for this time around. This is because Seb has recently been invested into our local Beaver colony. He will tell anyone who will listen (including complete strangers) that he is a Beaver with a necker and woggle. This statement is sometimes met with looks of confusion, but most people who have had some contact with the Scouting or Guiding movement will show what he deems to be an appropriate response. I quickly realised that there is a cooks badge and I asked him if he wanted to make some items towards it. He was even more eager than I could have anticipated!

This meal was eaten by the whole family and was entirely put together by Seb. There is a small amount of adult preparation. You could use tinned potatoes if you want to reduce the amount of adult preparation. We used tinned salmon, but you could cook some pieces of salmon instead. We also were able to use this activity to reinforce Seb’s understanding of whole, half and quarter as he quartered the boiled eggs. I completely love it when cooking can help with multiple areas of the curriculum!

Time to mix it all around!

Ingredients

  • 500g new potatoes (or other small potatoes)
  • 4 medium eggs
  • 2 tins of skinless and boneless salmon (170g each) or 4 salmon fillets
  • 150g sugar snap peas
  • 150g sweetcorn (tinned or frozen)
  • 2 salad tomatoes
  • 8tbsp reduced salt soy sauce
  • 1 inch piece of fresh ginger, grated
  • 3 cloves of garlic
  • Seasoning

Adult preparation

  1. Boil the new potatoes for 15-20 minutes, drain and leave cool.
  2. Gentle lower the eggs into boiling water and simmer for 8-10 minutes. Run under cold water and remove shells.
  3. Grate the ginger

Older children could do all of the above, but as Seb was making this after school I did the three above steps for him.

Method

  1. Preheat the oven to 170°c and spray a large oven proof (we used Pyrex) dish with Frylight.
  2. Cut the potatoes, sugar snap peas and tomatoes into small pieces and add the large oven proof dish.
  3. Cut the eggs into quarters and add to the dish.
  4. Add the sweetcorn.
  5. Remove the salmon from the tins and gently squish with a fork to separate and add to the dish.
  6. In a small bowl, measure out the 8tbsp of soy sauce.
  7. Add the grated ginger.
  8. Gently bash the garlic cloves with a rolling pin and remove the skin and then crush with a garlic press. Add to the soy sauce.
  9. Mix the ginger and garlic into the soy sauce and pour over the dish with the rest of the ingredients and gently mix.
  10. Place in the oven for 20 minutes. Remove from the oven and serve immediately.

Simon and I really enjoyed this dish. Seb wasn’t keen on the tomatoes, but in fairness he never is. Our little potato-hater managed to eat at least one new potato, but was adamant that he would not eat any more. As usual Ophelia managed to eat pretty much her whole portion. It was a nice family meal and one I am eager to repeat. Do get in contact if you make this as we would love to hear from you!

Rugby Wraps

My family has never had a particular tradition or connection to one particular sport. When growing up, my dad would always, I mean without fail, watch the Grand Prix. But it was never a family activity. I believe it was a source of mild frustration for my dad that neither of his daughters showed any interest in watching the motor racing with him. As a teenager, I remember looking forward to Grand Prix weekends as it meant I could have a Sunday afternoon to myself as long as dad wasn’t disturbed!

I always knew that my husband was a rugby fan; when I first met him he was wearing a Leicester Tigers rugby shirt. Although, if truth be told, I would have been hard pushed to tell you that! Before we were married, it was very easy for me to avoid watching the rugby with him and make other plans. However, when we married, I realised that I wouldn’t be able to avoid the game my entire life. So I set about trying to understand the rules. I asked many, many questions. It may have actually been the same question over and over again and after over 10 years of marriage I am somewhat ashamed to admit my understanding of the rules hasn’t progressed!

Ready to fill the wraps.
Seb with his wrap shortly before it was demolished!

My interest in understanding rugby was dwindling and then Simon told me that the 2011 Rugby World Cup was taking place in New Zealand. He asked me if I would like to watch the matches with him. I was rather reluctant as they would all be taking place rather early and although I am an early bird, I like my time to myself in the mornings. He promised me he would make me breakfast and a deal was struck. This was when what were initially called Rugby Sandwiches were created. In their original form, we used partially baked baguettes filled with a combination of scrambled eggs, bacon and sausage and mushrooms. I had mine with vegetarian sausages. Fast forward to the present day (and the airing of the Six Nations 2019) and we are still making these. We have exchanged the partially baked baguettes for wraps as the kids eat them better and they work well if you are following Slimming World! Isn’t it funny how life changes?!

and cooking mushrooms.
Seb scrambling eggs

I was really impressed with my six year old during this process as he scrambled the eggs himself and kept an eye on the mushrooms and mixing them around while I sorted the bacon. He was so very proud of his efforts, and proudly told his dad how he cooked the eggs and the mushrooms! The kids demolished a couple of mini wraps each and the grown ups had these with potato wedges. Everyone was rather happy!

Ingredients

  • Wraps (in our house the grown ups used normal-sized wraps and the children had a couple of mini wraps each)
  • Eggs (we used one for each person)
  • Mushrooms (we used about 50-60g as not everyone likes them in this house)
  • Bacon (we allowed 2 pieces per adult and 1 piece per child) or vegetarian sausages
  • Butter Frylight or margarine

Method

  1. Chop the mushrooms and put to one side.
  2. Crack the eggs into a bowl and whisk (Seb called it this the ‘whizz mix’ which made me chuckle! Seb shows you how it is done in the video below.)
  3. Put the bacon onto grill.
  4. Spray a small saucepan with Butter Frylight and add the mushrooms to fry. Mix every so often to stop them sticking.
  5. Spray another small saucepan or frying pan with Butter Frylight and pour the beaten eggs into it. As the egg starts to set, mix it all around until the egg is fully cooked.
  6. Put the cooked mushrooms and scrambled eggs into individual little bowls with spoons to serve.
  7. Cut up the grilled bacon and place in another bowl.
  8. Give everyone a wrap on a plate and allow them to spoon in the fillings they want and roll up. If you are not eating them immediately, putting a cocktail stick in the keeps them wrapped.
  9. Enjoy in front of the rugby!

Fish Fingers

We are only a week into the new term and I am already having to coax the kids out of bed in the mornings all the while trying to convince them that it is morning despite the darkness. It seems to be one of my eternal frustrations in my parenting expedition. I use the word expedition as I most certainly do want to conjure up the image of the sheer volume of allegedly necessary paraphernalia that the kids, and therefore me by default, accumulate and need to have on hand at any given time.

Dunking the fish in the egg mixture

Having just read the above, I think it is abundantly clear why parents tend to favour quick and easy evening meals. I know for me that by Friday all my intentions of well balanced, homemade and nutritious meals is abandoned and the kids eat ready made pizza and garlic bread and I heave a sigh of relief while they happily chatter and gobble it up. Fish and chips always used to be my go to meal for Friday evenings. However, this started becoming an issue when Seb started school and it turns out they serve a fish meal on a Friday at lunch. This made him reluctant to have fish and chips for a second time in the day so Friday food then became pizza and we now rarely buy fish fingers.

Covering with crushed cornflakes.

Lucky for me, my kids seem to like fish. I know for some parents the only way that their children will even contemplate eating fish is if it comes breaded and served with chips. But not all fish fingers are created equal. We like the ones made out of 100% fish fillet, they just taste nicer. And if that makes me a fish finger snob, so be it… Anyway back to our recipe. We decided to use crushed cornflakes (so much more than a breakfast cereal!) instead of breadcrumbs, some dried mixed herbs and garlic granules for added flavour and the result was really yummy fish fingers!

Ingredients

For the three children, we used 2 fillets of cod. I sliced them into ‘finger-sized’ pieces before starting cooking with the kids.

  • 2 fillets of cod
  • 75g cornflakes
  • 1tsp dried mixed herbs
  • 1/2tsp garlic granules
  • 1 egg
  • 1tbsp milk

Method

  1. Preheat the oven to 180°c and put a silicone baking mat on a baking tray.
  2. Put the cornflakes, mixed herbs and garlic granules into the food processor and blitz until fine and place on a plate.
  3. Crack the egg and gently whisk in a small bowl. Add the tablespoon of milk and mix.
  4. Dip the fish fingers in the egg and ensure all sides have been coated.
  5. Roll the fish fingers in the blitzed cornflakes to ensure that all sides are covered.
  6. Place on the baking tray and put in the oven for 15-20 minutes until golden and fully cooked. We turned ours half way through cooking time.
I was quite impressed at how contained the mess was at the end! Normally we have more spillages!

My kids had a lot of fun making these and there were no leftovers. If I am honest, I should have made more as I would have liked to have some too! I should also say that, my kids are generally quite messy in the kitchen, but this last photo shows the extent of the damage and this time around it was limited. I can’t express my surprise that they had managed to keep most of the crushed cornflakes on the plate! Maybe this is the start of less messy cooking sessions? Nope, who I am kidding there is no chance that this was anything more than a fluke! Do let me know if you make this recipe.

Pesto and Mozzarella Turkey Steaks

Now we are in December I have my festive hat on vis-à-vis Christmas recipes. I found some discounted turkey steaks a while back and placed them in the freezer until I was struck with inspiration for a dish that the kids could make for dinner one evening.

That is when I started thinking about putting a pesto and cream cheese spread on top of them to keep them succulent while baking them. The boys decided that the mozzarella was a good idea. We find in a savoury dish the amount of cheese is proportional to the kids’ happiness; the more cheese, the happier the children. 
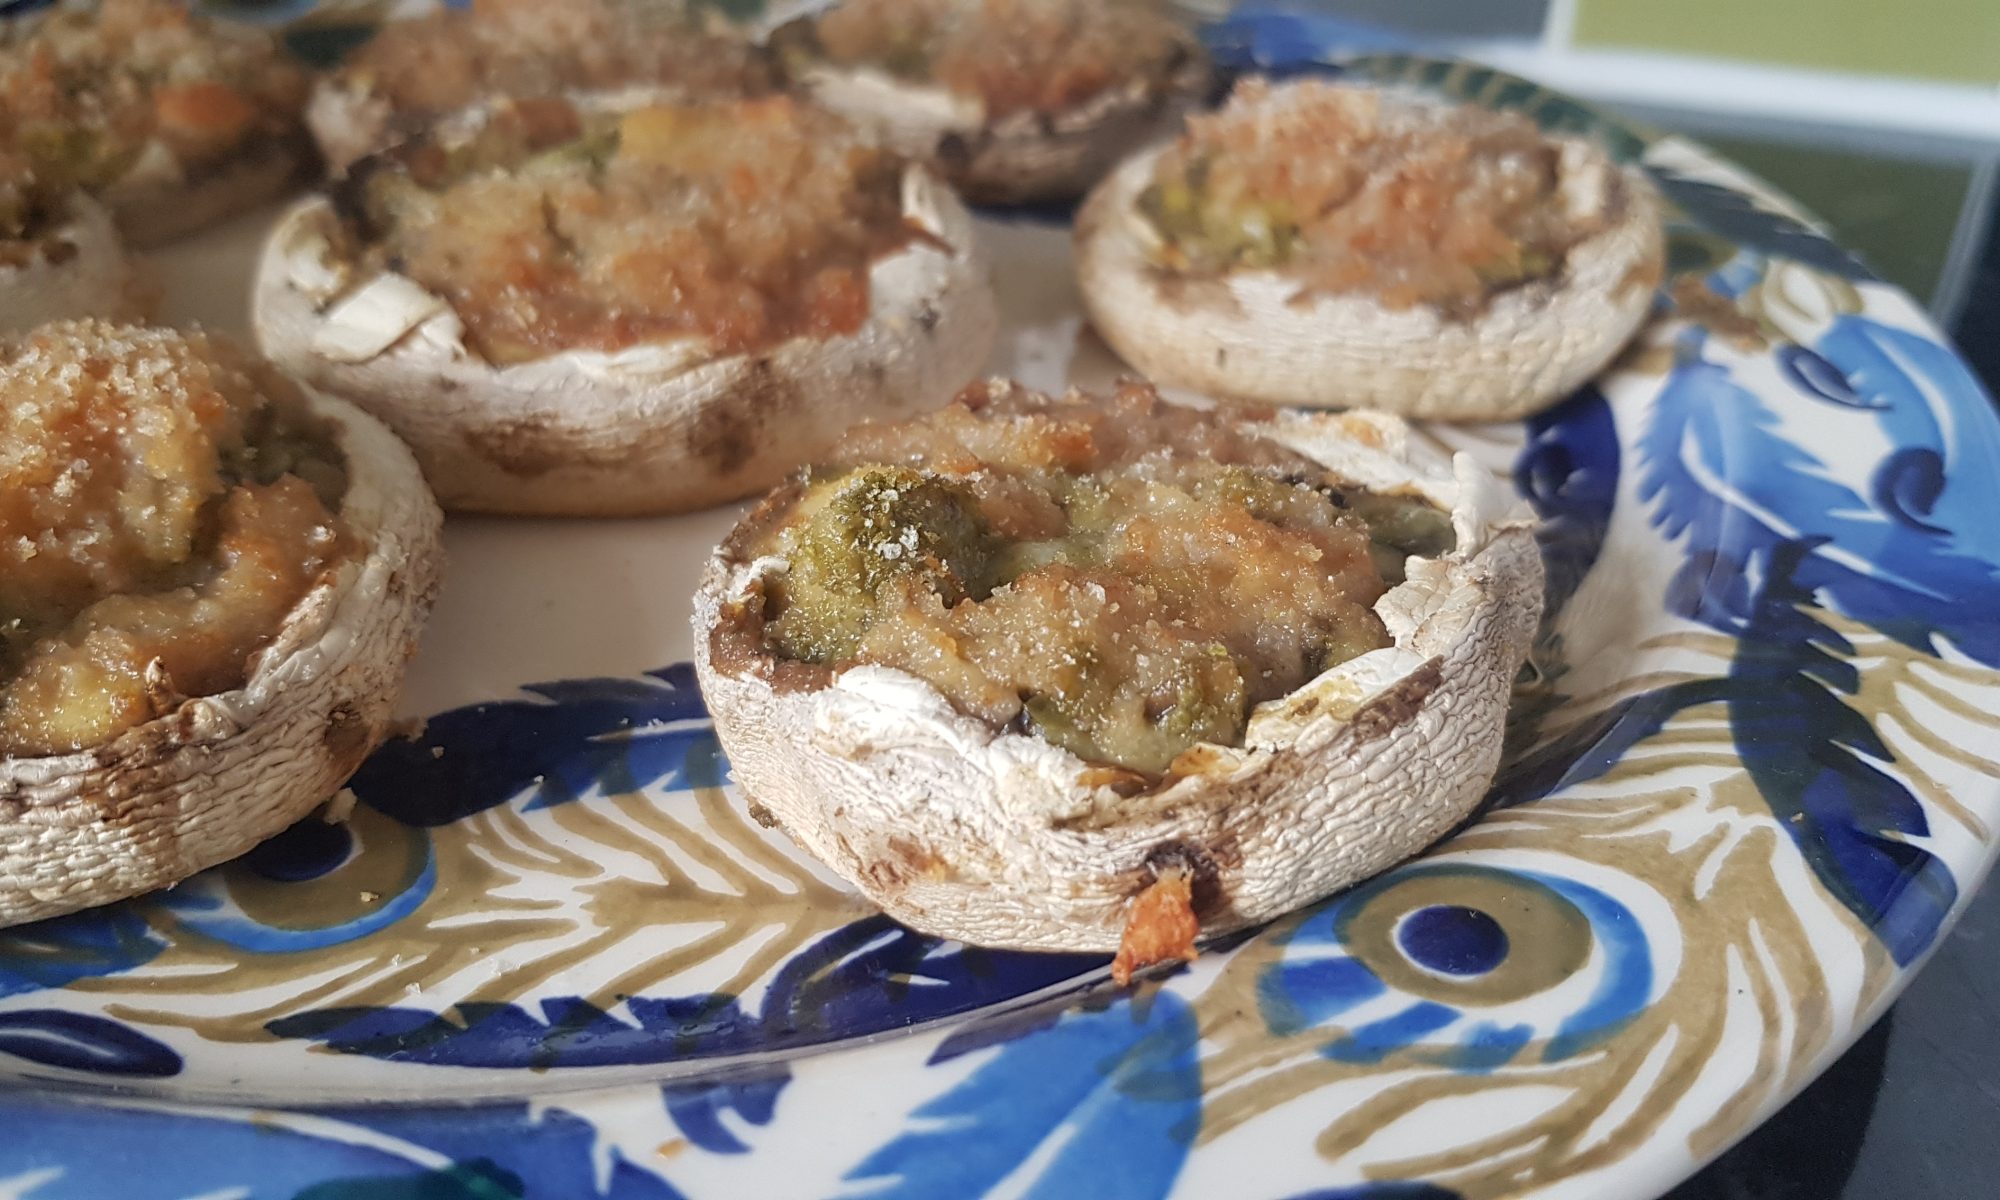
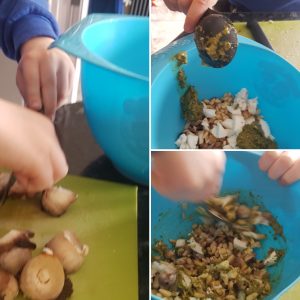
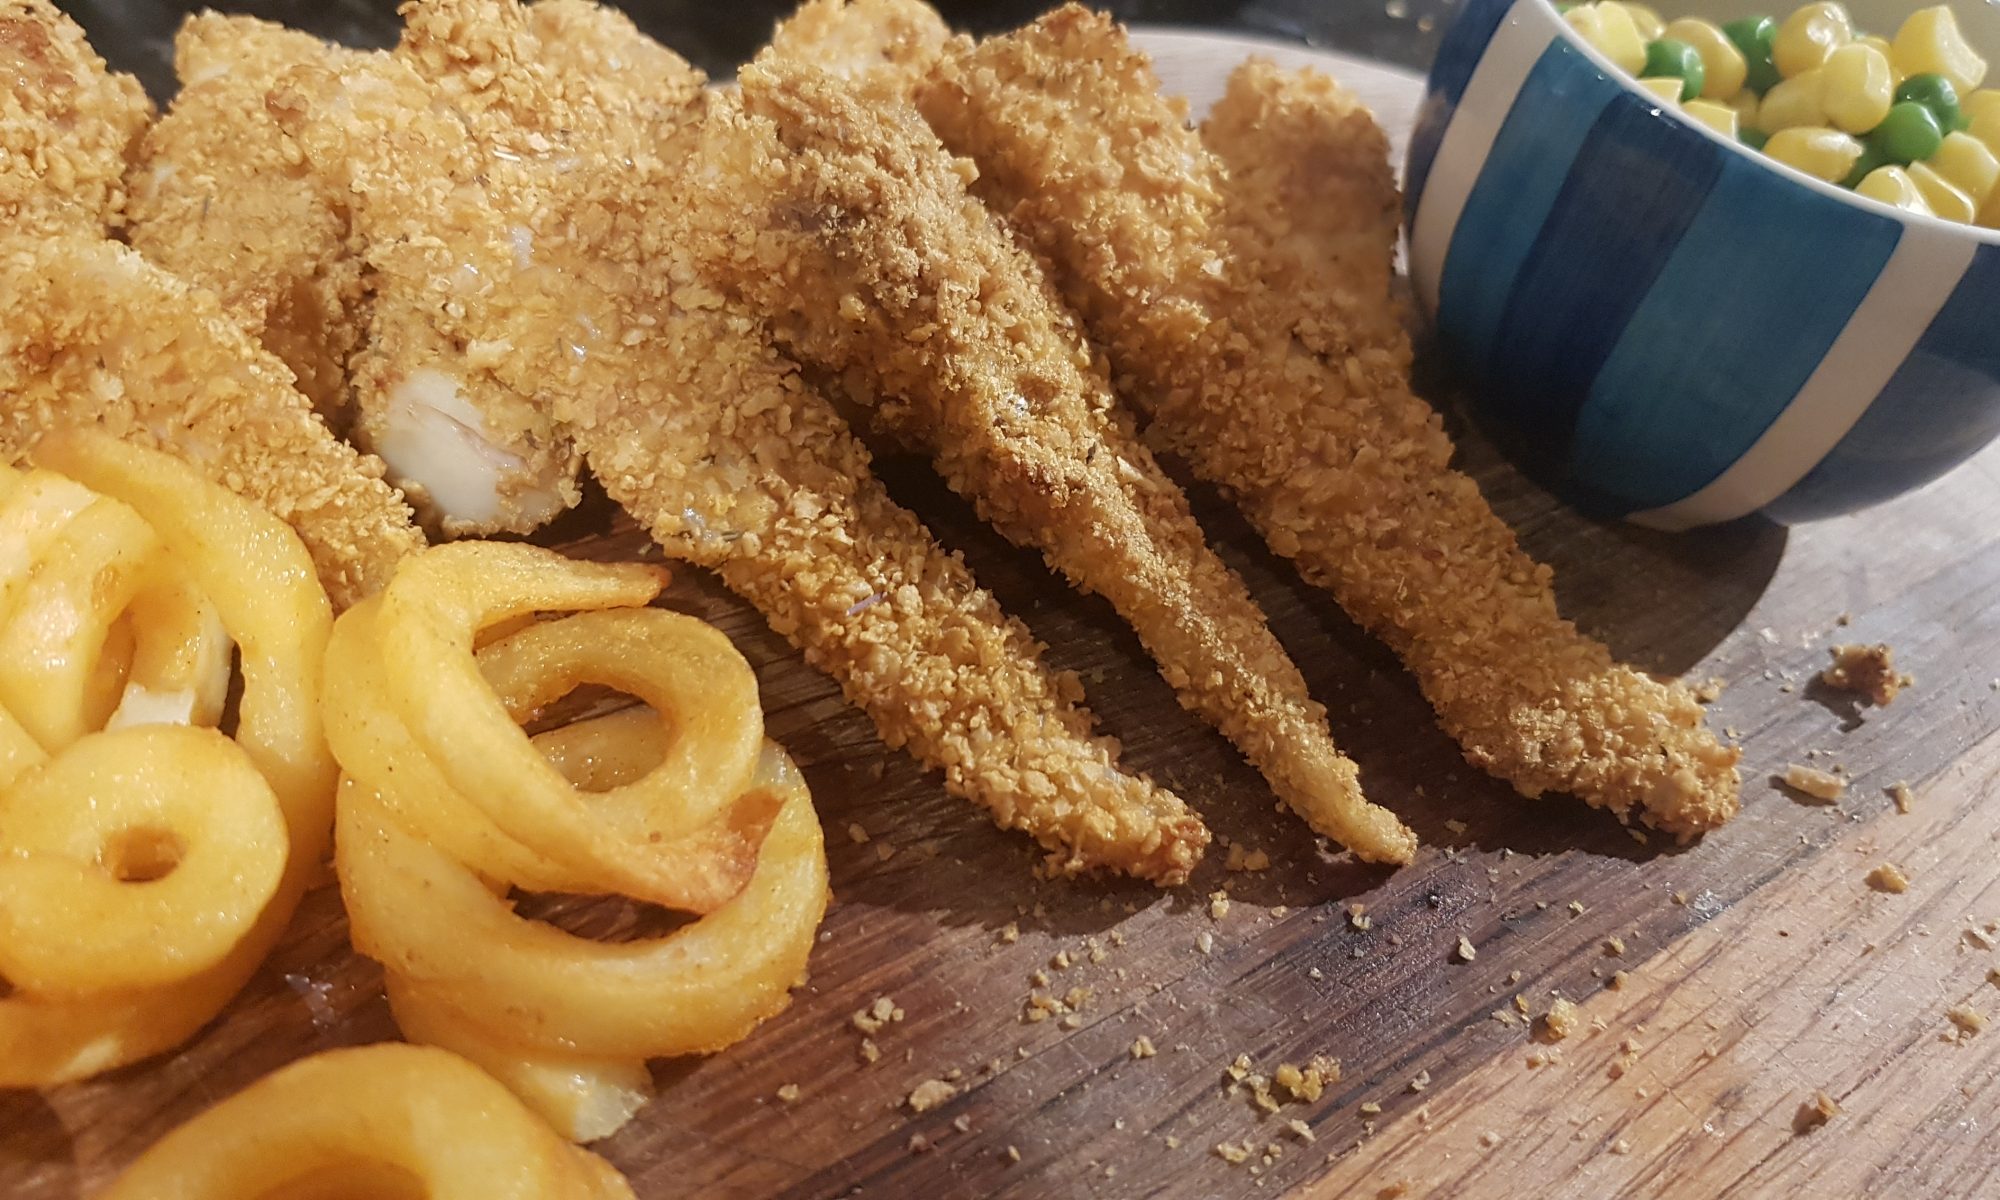
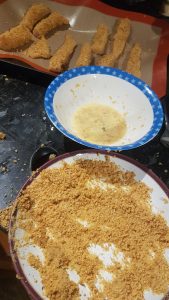
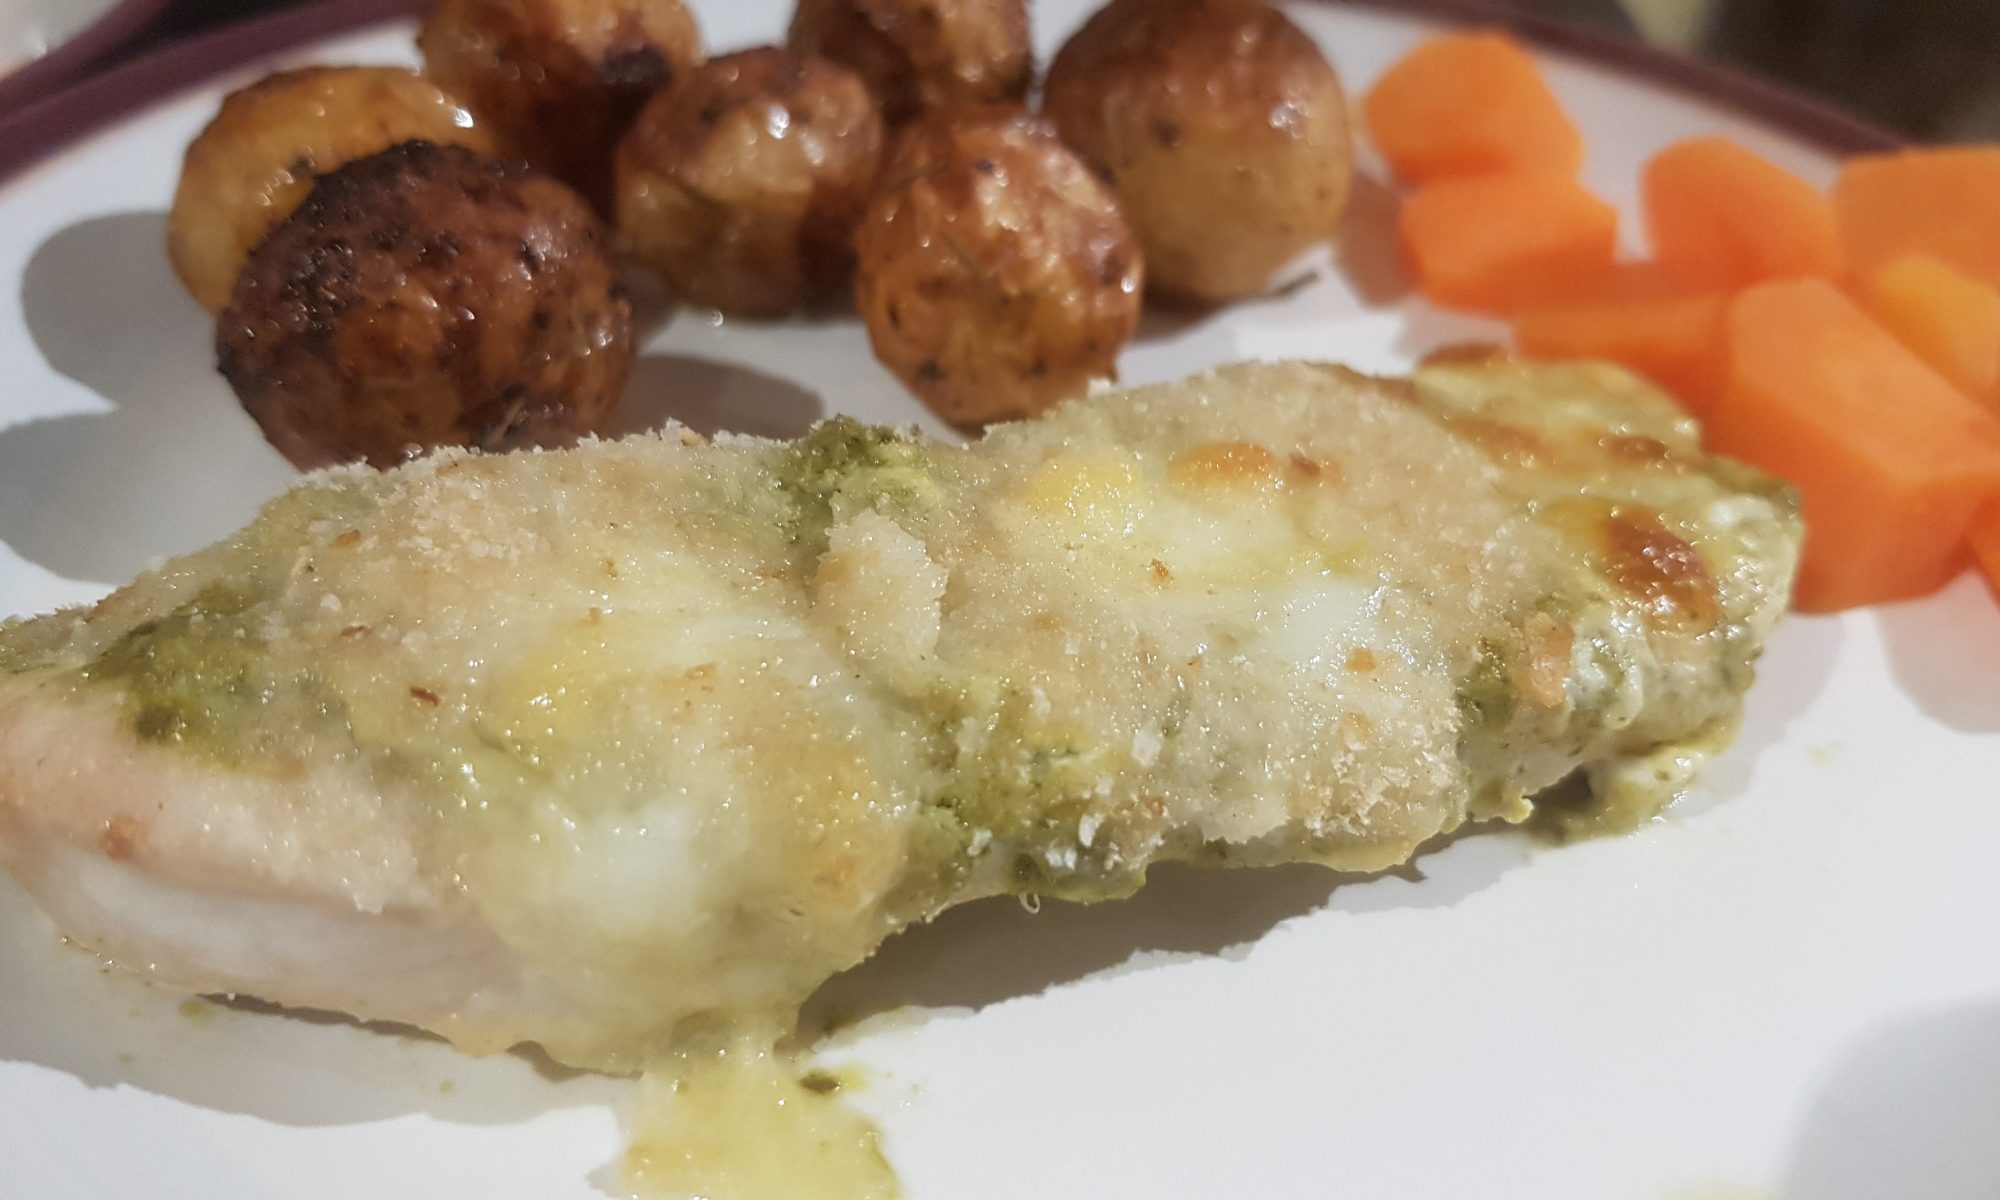
We added a sprinkling of dried bread crumbs to create a contrast in textures. Essentially, the turkey acts as a high protein pizza base – it didn’t take much convincing for my children to eat this! This means that if you do have any leftover turkey breast after your Christmas dinner, you could consider following this recipe, but grilling it to heat the meat through and melt the topping.

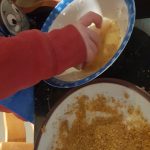
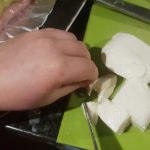
The kids loved spooning the pesto out of the jar and counting the same amount of tablespoons of cream cheese and then mixing it all together. They did a really good job of spreading it on top 
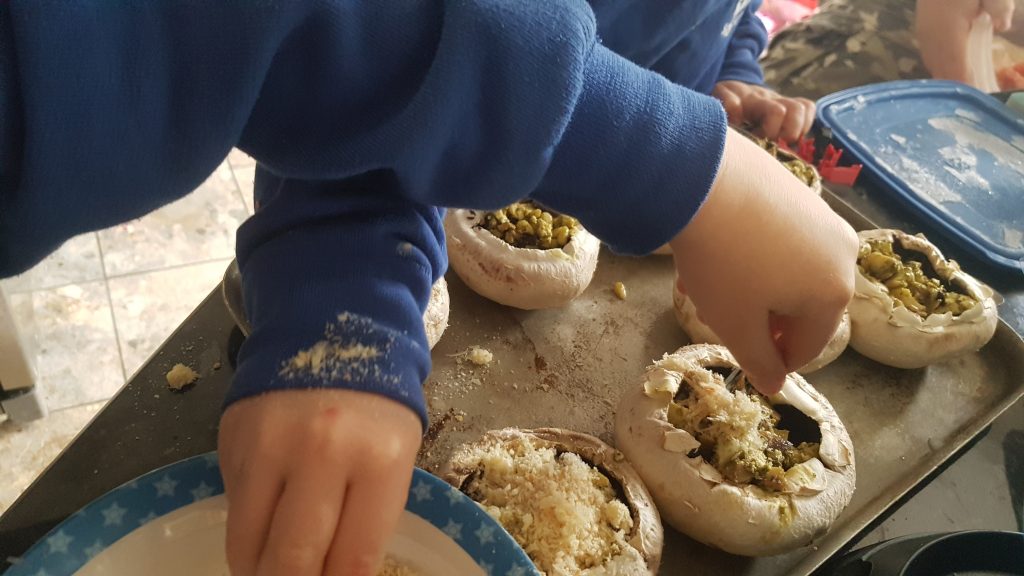
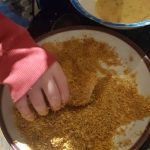
of the turkey steaks and then counting out bits of mozzarella to make sure all the steaks got their fair share of mozzarella. I think they had the most fun sprinkling the breadcrumbs and trying to make sure they landed on the steaks rather than the baking tray (with varying degrees of success, but they seemed to make a game out of it). As children are handling raw meat in this recipe, keep a close eye to ensure no little fingers end up in mouths.

Ingredients

  • Pack of turkey steaks or 4 thick slices of roast turkey breast
  • 2tbsp cream cheese
  • 2tbsp pesto
  • 1 ball of mozzarella
  • Breadcrumbs for sprinkling

Method

  1. Preheat the oven to 170° fan and line a baking sheet with tin foil or a silicone baking mat.
  2. Place the turkey steaks on the baking sheet. It may be easier for you to do this for the children to prevent cross contamination.
  3. Scoop 2tbsp of cream cheese out and place in a bowl. Add 2tbsp of pesto and mix well.
  4. Spoon out small amounts of the mixture and place some on top of each turkey steak. Spread out the dollops with a table knife or the back of a spoon (we used a table knife) so that all of each turkey steak is well covered.
  5. Cut the mozzarella into small cubes with a table knife and place some on top of the pesto mixture on each steak.
  6. Sprinkle each steak with some breadcrumbs and place in the oven to cook for 20-25 minutes until the meat is well cooked (clear juices and hot the whole way through). If you are doing this with already cooked roasted turkey, grill until warm through and the topping has melted nicely.
  7. Best enjoyed warm.

The whole family (minus the vegetarian) enjoyed these for dinner and there have already been requests for an encore! We hope you enjoy these as much as my family did.


Roasted Minature Potatoes

Are you a fan of a Sunday roast? In our house it is a family tradition. It is the meal for which daddy is usually responsible; it is best not to leave the vegetarian in charge of roasting the meat – she may instead decide to serve a nut roast. This would cause a riot. Simon is relatively happy eating veggie once or so during the week, but would never choose to eat a vegetarian Sunday Dinner! There would probably be mutiny in the ranks if I served a vegetarian Sunday Dinner…

Pretty much my favourite part of a roast dinner is the roast potatoes. I seem to easily put away considerably more roast potatoes than seems logical or sensible even. They are just so comforting and warm. As you have probably already guessed from my previous posts we wholeheartedly encourage our children to help out in the kitchen and when I found some Minature Potatoes during my weekly shop, they set me thinking about mid-week roast potatoes . I walked around the supermarket with a grin fixed upon my face thinking about having roast potatoes on an non-Sunday. Smaller potatoes means less roasting time which is perfect for mid-week and with them being small they have the added bonus of appealing to the children.

The boys shared the job of shaking the potatoes from side to side to coat them all in the oil mixture.

The hands on time for this recipe is minimal. The youngest of little kitchen helpers could definitely manage this recipe under supervision. I gave my two boys the instructions and they proceeded and successfully executed it by themselves (once I had decanted the oil into a smaller vessel to pour it – I did not want to have to clean an oil spillage). You could make this recipe with new potatoes or any type of small potatoes. If you are unable to find small potatoes, you could even cut down larger potatoes. Please do remember that the larger the potato, the longer the roasting time. Yes I am stating the obvious, but just in case as these things do sometimes slip my mind…

When the boys made this, they only made enough for thei
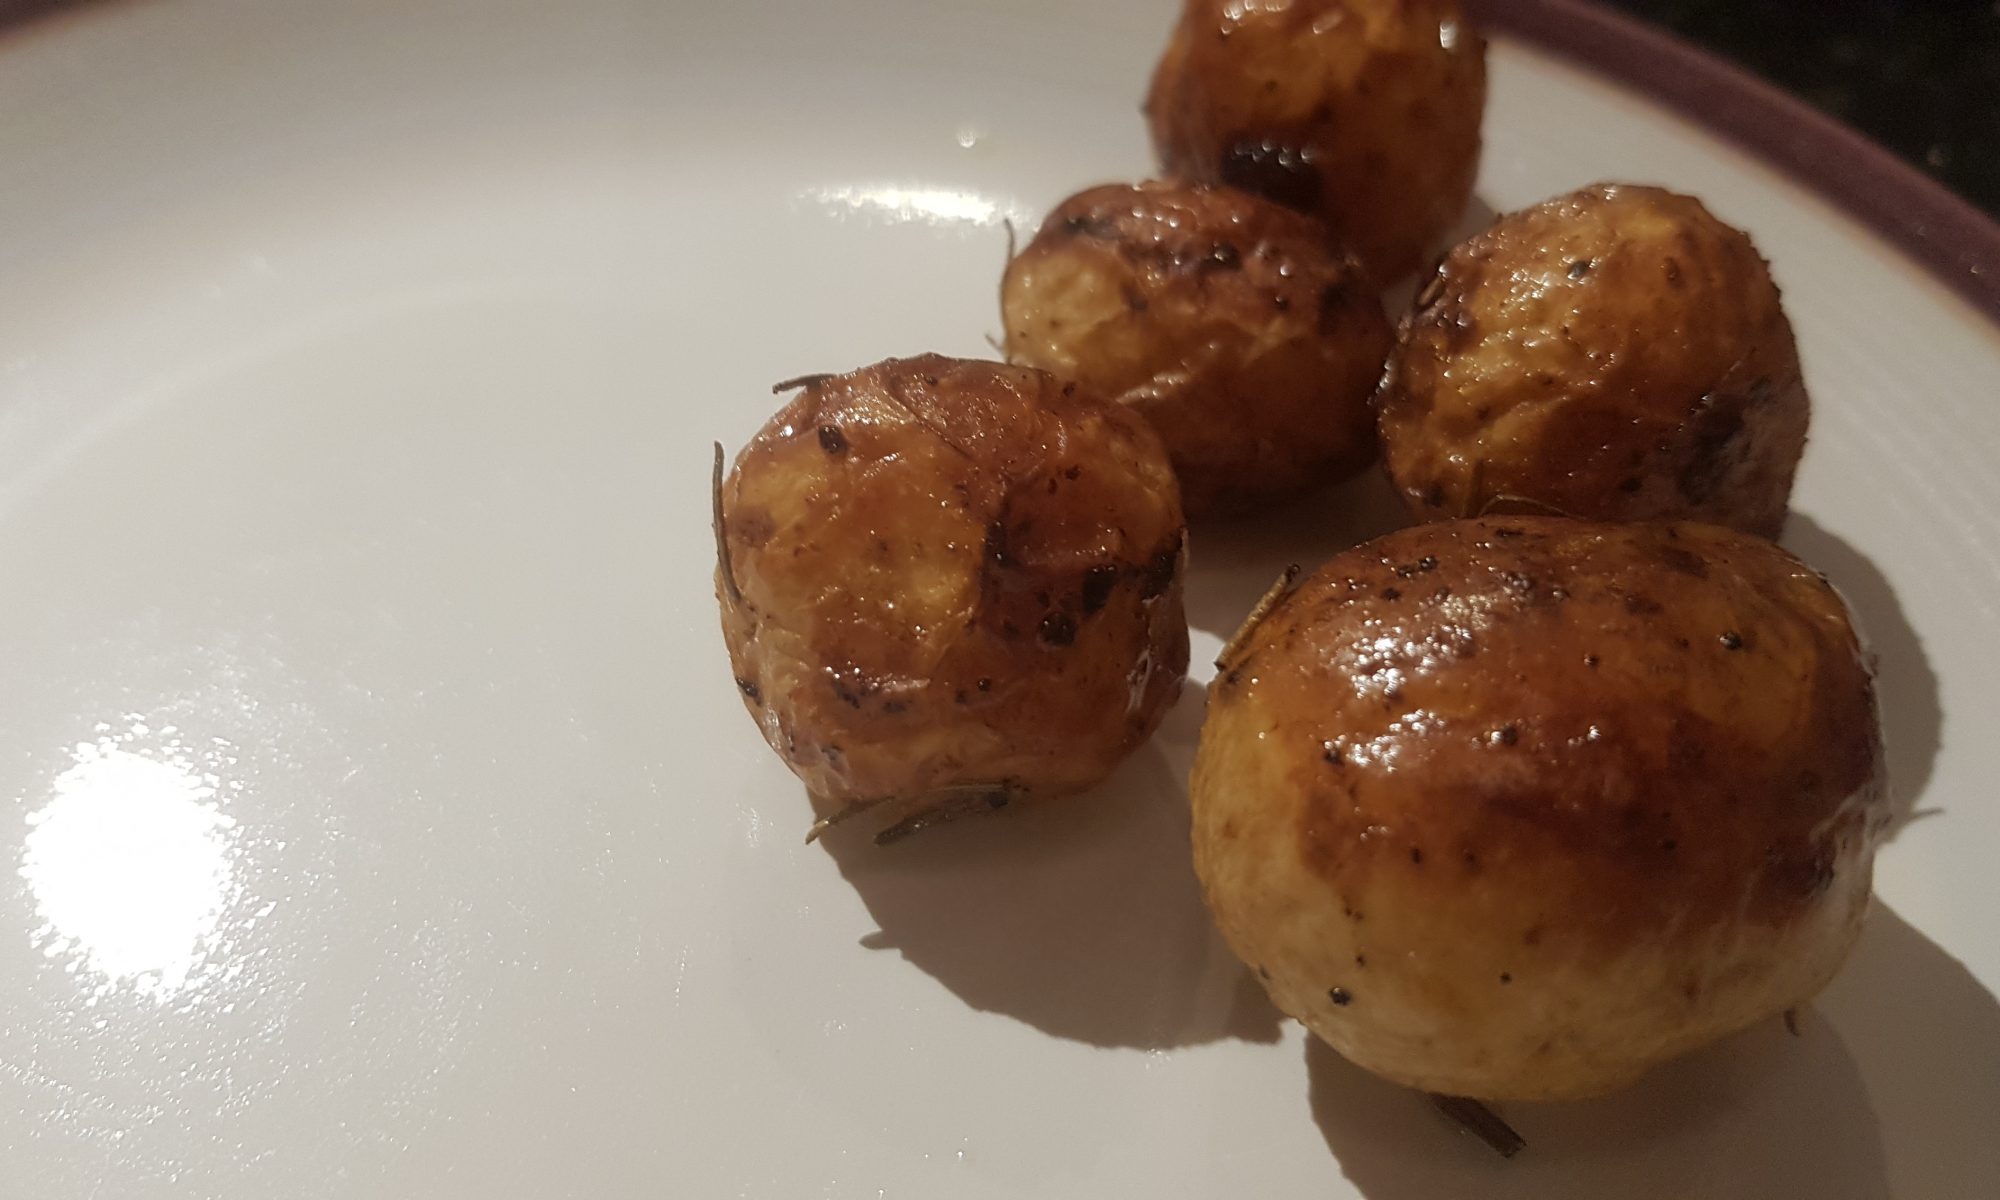
r dinner as us grown-ups tend to eat later.  This recipe can easily be increased to make enough for a family roast. Don’t judge us, but we always make more roast potatoes than it seems our family could eat, but by the end of Sunday they have generally all disappeared. I am not at liberty to divulge who tends to gobble them up between meals, only that they are never wasted!

Ingredients

  • 150g miniature potatoes
  • 3tbsp olive oil
  • 1tbsp lemon juice
  • 1/4 tsp garlic salt
  • A couple sprigs of fresh rosemary/2tsp dried rosemary
  • Pepper to season

Method

  1. Preheat the oven to 180°c and get an oven proof dish.
  2. Pour the olive oil, lemon juice, garlic salt and rosemary into a bowl and mix around. If you are using fresh rosemary, you will need to remove the rosemary leaves from the stalks and consider tearing large leaves in half.
  3. Add the potatoes to the bowl and gently shake it from side to side (not up and down unless covered!) to ensure that all of the potatoes are coated in the oil mixture.
  4. Add pepper to season the potatoes and mix again.
  5. Pour the oil-coated potatoes into the oven proof dish and place in the oven for 35-45 minutes until they are tender. Ours took just under 40 minutes. They may well require turning to prevent them from getting too coloured on the top.
  6. Sprinkle some salt on top before serving if you desire.

These were hit the spot and provided my midweek roast potato fix. They would also work really well if you have time restrictions on making your roast, or you are just somewhat impatient. I hope you enjoy them as much as we did. Our resident potato-hater managed one whole one and some of the insides of another – so maybe we are making potato progress!